Sign Up
Create your Tonet account and start making calls in minutes. No contracts, no commitments - just pick a plan, fill out the form, and you're in.
Visit tonet.ai/signup (opens in a new tab) to get started.
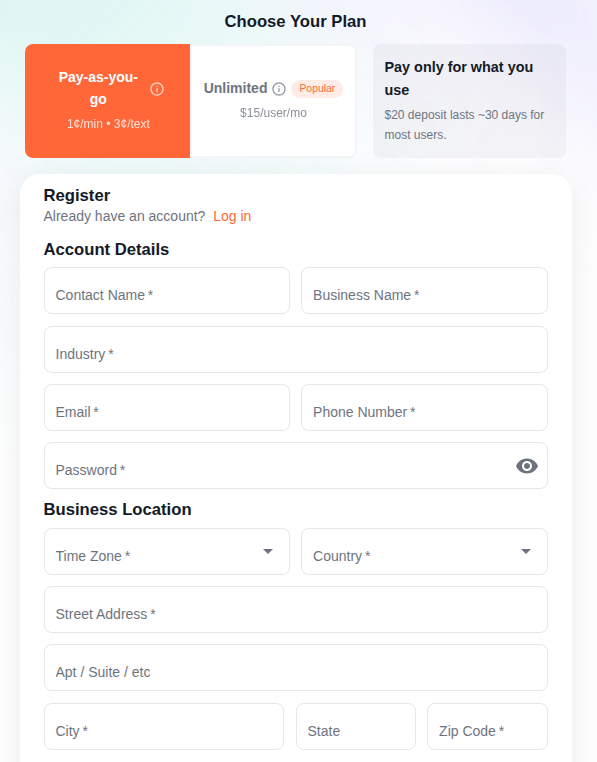
1. Choose a Plan
You'll pick a plan first:
| Pay-as-you-go | Unlimited | |
|---|---|---|
| Calls | Per-minute billing | Unlimited |
| Texts | Per-text billing | Unlimited |
| Base fee | Per user/month | Per user/month |
| Billing | Daily, active days only | Daily |
| Best for | Low-volume or seasonal businesses | Teams with consistent call volume |
Both plans include all features - call recording, voicemail transcription, auto attendant, SMS, and everything else in the dashboard. The only difference is how you pay for usage.
For most businesses, Unlimited is the best value - predictable monthly costs with no surprises on your bill, no matter how many calls you make.
2. Fill Out the Registration Form
Account Details
- Contact Name - Your full name
- Business Name - Your company name. This is your account name across the dashboard.
- Industry - Your business industry
- Email - Your login email. Make sure you have access - this is how you sign in.
- Phone Number - Your contact phone number
- Password - Minimum 8 characters
Business Location
- Time Zone - Your business timezone. Your call logs, schedules, and calendar all use this timezone. You can change it later in Account settings.
- Country - Your business country
- Street Address - Business street address
- Apt / Suite / Etc - Optional unit or suite number
- City - Business city
- State - Required for US addresses
- Zip Code / Postal Code - Postal code
Additional Information
- How Did You Hear About Us - Select from the dropdown (Facebook, LinkedIn, Reddit, X/Twitter, Google, or Other)
- Promo Code - Optional. Enter a promo code if you have one for a discount.
3. Create Your Account
Click Create Account to submit. If anything is missing, you'll see a message on the field that needs fixing.
Once you're registered, you're automatically signed in and taken straight to the dashboard.
Activate Your Account
Before you can start making calls, you'll need to add a card and make a small deposit.
- Go to Billing in the sidebar
- Click Add Card to add your credit or debit card
- Make your first top-up (minimum $20)
After your first payment, your phone system is set up automatically within seconds - no waiting for approval.
Set Up Your Phone System
Once your account is active:
- Get a phone number - Go to Phones and click Purchase New Number to browse local and toll-free numbers. Pick a number and it's yours instantly.
- Add team members - Your admin account is created automatically. Go to Users to invite your team. Each user gets their own extension and login.
- Start calling - Open the dialpad from the sidebar and make your first call right from the browser.
From there, set up groups for team ring strategies, create an auto attendant for professional call routing, configure schedules for business hours, and explore SMS messaging - all included with your account.